Showing posts with label cardmaking. Show all posts

Wednesday, October 15, 2014

Using Cardstock for the Chalkboard Look

Yep, it's me again getting my crafty groove on. I couldn't be more excited to be taking time out to do the one thing that I love...MAKE STUFF! A few weeks ago this card was featured on the Core Blog:

Celebrate your next Birthday with a Core'dinations Black Magic card. With some simple sanding and heat embossing you can make it look just like chalkboard!

  BM-main-copy
  Black Magic Birthday Card Supplies:
BM cu3

Step 1.   Begin by sanding the Black Magic cardstock first. It's important you sand BEFORE you stamp and wipe dust with Dust Buddy. Removing excess sand will help the clear ink pad stamp clearly to ensure a crisp image when you emboss.

  BM cu2

 Step 2. Emboss with Tim Holtz & Ranger heat embossing powder. I like to use my scraps because sometimes it takes a few tries to get a good image.

  BM cu1

Step 3. Add layers of Glitter Silk and more Black Magic along with embellishments.

  BM-cu4


Photobucket

Friday, November 01, 2013

Hard Core Crop Handmade Elements Challenge

Welcome to Core'dinations Hard Core Crop! 

 Make sure you grab your blinkie and wear it proudly ALL WEEK LONG! Core'dinations is offering a prize the person using it as their Facebook profile photo so grab it here and head over to the Facebook event page and let them know. 
PLUS we are chatting and sharing projects over there, too. IT'S FUN!


 If you have joined us before the rules work pretty much the same. Whether this is your first time or you are a returning Hard Core Corpper PLEASE make sure you head over to the Core blog for a full list of rules HERE. They are pretty straight forward..you must use Core visibly on your projects, upload using the linky at the bottom of this post by midnight November 10th EST, and follow my challenge rules but please make sure you follow the rules and check them out on the Core blog. BUT the most important rule...is to CREATE AND HAVE FUN! :) If you would like to see a full list of the challenges head over the Core blog HERE for a list that will be updated continually throughout the weekend. 


Now who wants to get crafty? My Challenge is all about using Handmade elements: Creating with Core'dinations is all about using techniques. For this challenge, I want you to create your own handmade elements on your project. Some examples are hand cutting embossed images, make your own flowers, draw your own designs and cut them out..sky is the limit! Punched or diecut images are okay but you must maniuplate them somehow to create something other than it's intended use like I did below... simply punching or diecutting an element is not enough.... BE CreAtiVe and have FUN

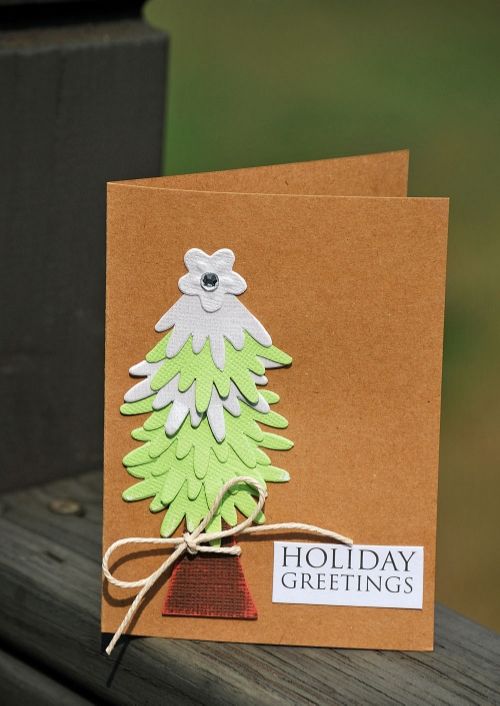
 For my example, I used some David Tutera Celebrate Cardmaking system flowers on a smooth Kraft cardbase and cut them apart to create the Christmas tree. These were orginal starburst/flower images and now they are a Chrimstmas tree! Then I just freehanded the tree trunk our of some Chocolate Box and sanded it to release that inner red Core. And of course you gotta sand sand sand your Core! Finish off by adding a white sticker sentiment and other details on your cardbase.

You can do a card, layout, altered project...whatever you want!


Now..we are all about the Holidays here but feel free to make any theme card you wish as long as it follows the challenge rules. AND one lucky winner will get this awesome pack of Core'dinations Cardstock! Tim Holtz & Ranger Distress!


Use the InLinkz tool below to link up..blogs...galleries..Pinterest...Flickr...just make sure it is a DIRECT link.


 Photobucket

Tuesday, February 12, 2013

Core & Hampton Art


Hi! Happy Tuesday!

I hope you are  having fun with Hampton Art & Core this week! Today I have a gift bag set for you using Core'dinations David Tutera Celebrate cardmaking system and Hampton Art stamps.

Did you know that the Step 2 layers fit perfectly on craft bags?!  How cool is that and I picked these up at  my local craft store and the A7 Large Dot embossed layer fit great. Don't forget to sand ;)
I used a bookmark tag from Step 3 for this cutie little owl. He is so sweet! You can never have too many owls in your stamping arsenal!

{remember to click on pics to make  them larger...a fun little slide show pops up}

and here is a close up of the bookmark/tag. I actually cut them on a smooth cardbase that I messed up and was going to throw away. So instead...I stamped on it and then cut the images out and raised the owl up with a pop up dot.


And you need a card, RIGHT? I add some Hampton Art stamps to the envelope and the inside of the card. 


I mixed and matched some Step 3 layers and our Chocolate Box cardstock. Thought it went with the pink and brown thing. I have boys so I rarely get to use pink!!!!


SO..here is your list...happy hopping!!!

Ellen Sosnoski http://closeyourears.blogspot.com/ (you are here)

Remember to start at Core and end at Hampton Art---> THEY BOTH HAVE GIVEAWAYS!!!!

Hampton Art blog: http://blog.hamptonart.com/ START HERE
Core'dination's blog: http://www.coredinations.com/index.php/cat...scrapbook-blog/END HERE
Photobucket


Monday, June 11, 2012

May Arts Design Team Call

Morning!
Not sure you saw the May Arts DT call here. If you didn't you better hurry up and get your application in!!!

Not only is the ribbon just gorgeous...gorgeous....BUT they are so generous and just awesome to work with. If you want to be a part of something amazing...then PLEASE check it out and send in your app NOW!

I really hope to be able to stay on and do videos in a cameo spot. 

Today I have some projects for you using May Arts ribbon of all kinds.  The video is about weaving May Arts Twine in the Burlap. Two MUST haves if you love ribbon!


And here is a layout that I created using more May Arts twine and this time I braided them. I cannot get enough  of this twine!!!

Then I used my Tiny Attacher to make keep the ends together. I used Prima Sun Kissed for the patterned papers and letters from the FTLOA store. And the cute little be is a Sweet Stamp Shop stamp and I used my Spectrum Noir Markers.


Next up is a fun card that I created using some May Arts Burlap string and some Lawn Fawn Stamps.
Who knew flocking was so much fun!!!!!

There is a video below showing tips on how to make the flag, do the flocking on the sheep and the grass.


Last but not least.....
I used some May Arts Twine and weaved it in and out of  the May Arts Burlap Ribbon. This stuff is so FUN!!!! It is great for home decor projects but it looks fab on layouts, too!


Here is a close-up...all you need is a large needle (I call them leather needles not sure if that is accurate but they are thicker and heavy duty and they manage the thicker Baker's Twine really well).


Have a good one!


Photobucket

Friday, July 02, 2010

It is Vacation Time!

It is Friday and we are off for vacation so I will be seeing you next week. Please Please have a save and Happy Fourth of July weekend!!!

I was lucky enough to play with some of the Traveling Stamps over at FTLOA. If you haven't joined over there yet you should! They do a lot of fun stuff like this. Norma designed these specifically for us...aren't they cuuuute? You can do a lot with these...


Here are the cards I created with the stamps. I also used Core'dinations Cardstock {Black Magic on the butterfly and Vintage for the Mauve color and Core Essentials is the white}. I love to stamp on Core'dinations. Even though it is textured, you can still stamp on it.


I used Spellbinders dies for the scallops...the circles fit perfectly!


Have a Great Weekend!